During December I was super excited to take Wilton Course 1: Building Buttercream Skills. This is a course I had wanted to take for a long time but just haven’t been able to fit it into our schedule. The class was held at Michaels and normally runs once a week for four weeks. Each class is two hours for a total of eight hours instruction. However I wasn’t able to take a four week class so I took advantage of the condensed classes offered for course 1. The four lessons were combined into two three hour sessions. This review is for the first class covering lessons 1 and 3.
Before I begin I’d like to mention that I was extremely lucky with this course. I was the only one signed up (it was December and I guess everyone else was rushing around preparing for Christmas) and ordinarily the class would have been cancelled. But, it was my instructor’s last class ever and she decided to teach it even though I was the only student. So essentially I got a private lesson. That was excellent.
Prior Baking Experience
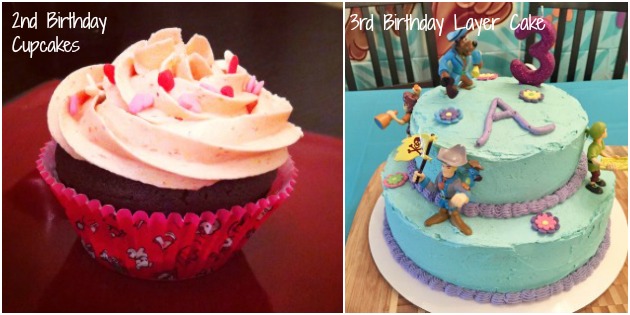
While definitely not an experienced baker I had dabbled a little with buttercream prior to the course. For my daughter’s second birthday I made double chocolate cupcakes with real strawberry buttercream icing. They were scrumptious and I was really happy with how they turned out.
For my daughter’s third birthday I challenged myself to make a double layer tiered cake. Aside from piping bags, couplers and a few decorating tips I had no cake decorating tools. I used a cutting board as a cake turner and used a silicone spatula and butter knife to ice the cake. I had planned to pipe a border of violet shells but when it came time to do so, T minus 15 minutes before the guests arrived, I realized I didn’t know how so I settled for squiggles. I further decorated with store bought royal icing flowers and Scooby Doo pirate toys.
With the internet as my guide I was able to piece these creations together but by taking the this Wilton buttercream skills course I learned some great techniques to speed up the process and save the muscles in my arms (they were quite fatigued after piping way-too-stiff icing).
What You Need to Take Wilton Course 1: Building Buttercream Skills
The first thing you need to know is that you need to pay for more than just the class. I thought $25 was a great deal for this course but I didn’t realize that I needed further materials. But if you plan ahead and either shop online or use the 40% – 50% off coupons periodically offered through the Michaels app or website, then you can keep your costs down.
Essential Items to Buy for the Course:
- Wilton Course 1 Student Guide. This is essentially your ‘textbook’ for the course outlining everything you need to know and it includes photos and instructions for each decorating style you will be taught.
- Wilton Course 1 Student Kit. This kit has everything you need to create fabulous designs in buttercream icing plus some extras. I was hesitant to buy this because I already had a few of the items (couplers, decorating bags and a few of the tips). But don’t let this stop you. You will always need more of these items and having duplicate tips is awesome if you’re using more than one icing color for the same design. Yes, using a coupler will enable you to switch your tips but it’s so great when you don’t have to 🙂
- 4.5lb tub of Wilton Ready-to-Use Cake Decorator Icing. I thought I would prepare my own buttercream icing for the course but my instructor insisted I buy this. She said when you’re learning new techniques it’s best to use icing with the ideal consistency. Consider the Wilton Decorator icing your buttercream ‘training wheels’. This tub is medium consistency and provided enough for me to decorate six cupcakes, an 8″ single layer cake, 36 mini cupcakes and I still had icing leftover. Because it was winter this icing was stiffer than medium consistency and I was able to use it for piping roses and didn’t need to purchase the 1 lb icing tub listed below.
- 1lb tub of Wilton Ready-to-Use Decotator Icing. This icing comes in stiff consistency ideal for piping roses.
Optional Items (Not Essential but Make Life Easier):
- 9″ Angled Spatula. The course 1 student kit includes a straight spatula which is great for mixing icing. But for icing and smoothing the surface of a cake I highly recommend an angled spatula. It’s so much easier to get the job done when you’re not continually brushing your knuckles against the icing.
- Cake Turner. Not essential but nice to have. If you’re going to go on and take additional cake decorating classes then you may want to invest in a cake turner. If not, then you can make do with a cutting board or something similar to perch your cake on.
- Icing Colors. Most instructors will provide their students with some icing colors but it’s so nice to have your own.
Items to Bring from Home:
- 4 – 6 Containers with lids. You’ll use these to mix, tint and store tinted icing.
- Toothpicks. You’ll need several of these to apply gel colors to icing. You want to use a fresh toothpick each time so bring a whole container.
- Carrier for cupcakes. You want to make sure your masterpieces make it home in one piece. Check out my handy DIY cupcake holder tutorial.
- Large bag to carry everything home. A 20″ x 20″ kitchen garbage bag will do. At the end of class don’t plan on washing up your gear at the store. Just throw it into your kitchen bag and wash it at home.
- 6 Cupcakes for the condensed lesson, or Cupcakes for lesson 1 and Cookies for lesson 3.
What You’ll Learn In the Wilton Course 1 Condensed Class #1
As I’ve mentioned above the first condensed class covers lessons 1 and 3. But, instead of bringing both cupcakes and cookies you just use the six cupcakes asked for in lesson 1.
Overview and Preparation: The instruction will begin with an overview of the materials in the student kit and then you will learn how to prepare a decorating bag. I already knew how to insert a coupler and secure the tip but what I did learn was that I had been overfilling my piping bags. It’s best to only add 1/2 cup to 1 cup of icing at a time so you have better control when piping.
Icing Consistency and Tinting: The next topic we went over was icing consistency. I learned the difference between stiff, medium and thin consistency and when to use them (thin for spreading icing on cakes, medium for most piping techniques and stiff only for roses). This was a huge eye opener for me because before this class I did everything with stiff icing. That layer cake above? All stiff baby. By the time I got from one side of the cake to the other, the starting point was almost hard! And piping those strawberry cupcakes? My forearm was killing me at the end.
Next we learned about how to tint icing and some different striping techniques that can be used in combination with a decorating bag. Instead of just tinting the icing just one color you can create a variegated effect by either putting two colors in one icing bag (you’ll see this one in action soon), using your spatula to add stripes of colored icing to the inside of the bag before filling with another color, or you can paint the icing color gel directly onto the side of the bag with a brush before adding your icing.
Piping Designs: We learned about piping bag positions (90 degrees and 45 degrees) and talked about piping pressure and maintaining control and consistent pressure.
Finally we got to piping icing onto a practice board (included in your student kit). Let me tell you how much I love the practice board. Since it’s a clean surface you can practice your designs as much as you want and then scrape the icing up with your spatula and add it back into your piping bag. It’s a renewable resource.
Tip 21 – We started with single stars, then rows of stars and multiple rows of stars working on control and filling all the available space. Then we moved on to rosettes, loops, wavy lines and shells.
Tip 12 – We worked on creating dots and trying to minimize ‘peaks’ when pulling up from piping the dots. Then we learned the ‘pulled dot’ technique where you make a dot and then use a spatula to pull it into an elongated shape.
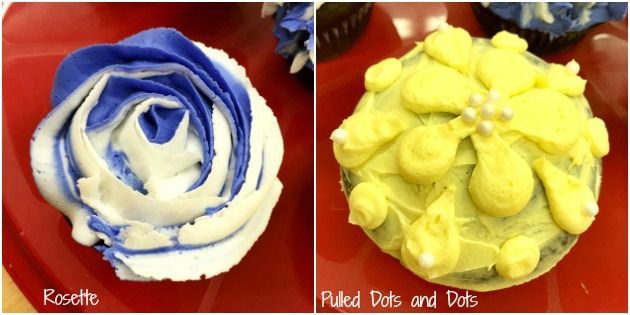
The rosette cupcake above was made using a 2D tip and the decorating bag had white icing filled on one side and royal blue icing on the other. They combine to form a cute ribbon pattern within the rosette.
The second cupcake was created with a #10 tip combing dots and pulled dots and accented with edible pearls. (I wish I had done more than just a crumb coat first though).
Tip 352 – Creating leaves was so much fun. We practiced making them the regular way, creating a ruffled leaf and then making leaves that stand up. I loved making leaves so much that I was inspired to create some cute mini Poinsettia Cupcakes for a Christmas party.
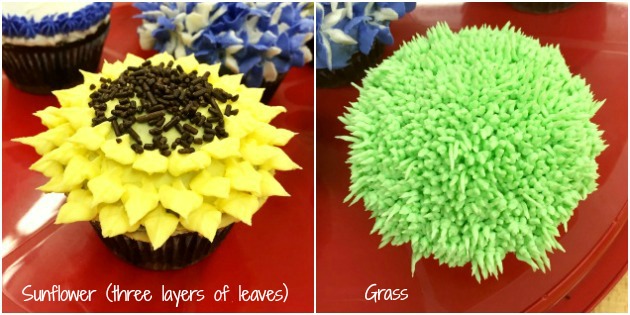
Tip 233 – I never would have thought knowing how to create grass would be useful but now I can’t believe I didn’t see all the possibilities earlier. This tip is fabulous because in addition to grass (which will come in handy for Easter cupcakes) you can pipe other colors of icing to create fur. Add some royal icing eyes and you have instant monster cupcakes.
The leaf technique was used to create a sunflower cupcake with chocolate jimmies in the center. Green grass was piped all over another cupcake (add two eyes and this could be Oscar the Grouch). I let my 3 year old have the first pick and out of all the cupcakes she chose the green grass cupcake. She kept reminding us all through dinner that this one was hers.
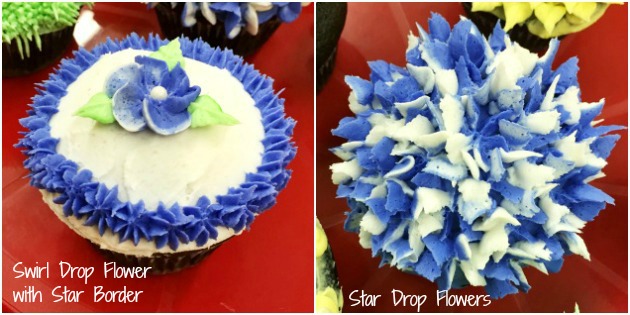
Tip 2D – We worked on the star drop flower which can be used on its own (perhaps filled in with an edible pearl or another color of icing piped with a round tip) or in a cluster. Then the swirl drop flower. This one was kind of tricky because you have to start piping with your wrist turned inward towards you and rotate it clockwise while you pipe to create the swirl part of the flower. Knowing when to stop is key.
For the first cupcake I used tip 21 to create a star border then tip 2D to create a swirl drop flower. Tip 352 was used for the leaves. The second cupcake was all 2D star drop flowers starting at the center and then working my way outwards.
Tips and Techniques Not Used:
- Tip 230 – We discussed the technique used to fill a cupcake but didn’t do this in class.
- Tip 1M -In the student guide the 1M tip is used for making a large rosette on a cupcake. We used tip 2D to do this instead. Same technique though so I will have no problem using the 1M tip for this on my own.
- Tips 16 and 18 – We used tip 21 for all open star techniques. The design would have been the same with tips 18 and 16, only smaller and tighter.
- Three techniques that we didn’t do that are listed in the book are the easy ruffle (tip 104), daisy (tips 3, 12 and 104) and the zinnia (tips 12, 352 and 16). But after learning all the other techniques I think I’d be able to figure these out on my own.
Biggest Challenges: Out of all the techniques discussed above I’d have to say shells and the swirl drop flower were the most difficult to master. Especially shells. This is because a certain amount of coordination is required for both these designs. With the swirl drop flower you have to work at maintaining even pressure and finding the ideal speed to rotate your wrist while creating the flower. Too fast and the petals will be ill-formed, too slow and things get messy. Practice makes perfect. I’ll discuss shells more in my next post because I decided to challenge myself and use them for my cake border.
Overall I was very happy with everything I learned and the quality of the cupcakes I was able to decorate with just one lesson. My instructor was excellent. She was patient and was able to help me correct any technique issues I had so that I could create the designs properly.
I was sent home with my little creations and some homework: to practice my piping with the piping board and come to the next class with an 8″ single layer cake.
The second class is covered in the second part of my review.


Leave a Reply