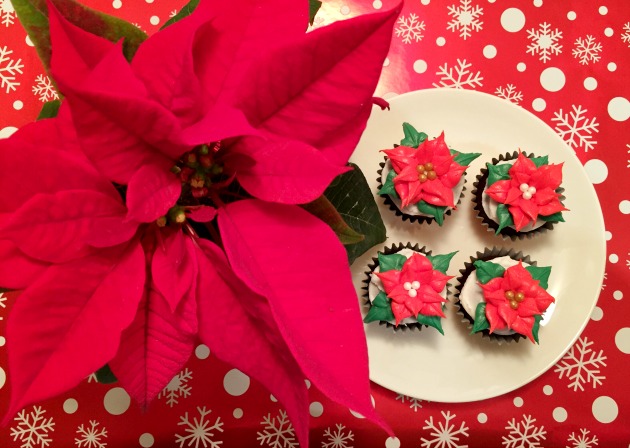
I absolutely adore poinsettias. With their vibrant red and green colors they are the perfect Christmas plant and I can’t imagine celebrating the holidays without them. Fresh out of my first Wilton cake decorating course I was inspired to create a batch of mini poinsettia cupcakes for my husband’s office Christmas party. They were so much fun and got lots of compliments. If you’re looking for an impressive treat for your holiday party then I highly recommend these little beauties.
Materials Needed for 36 Mini Poinsettia Cupcakes
- Cake or cupcake recipe of your choice (I made vegan cupcakes based off of the chocolate fudge cake recipe from the Oh She Glows cookbook. Half the recipe yielded 36 mini cupcakes).
- 3 cups of light colored buttercream icing. I used the leftover Wilton decorator’s icing I had from my course.
- Wilton icing colors: Christmas Red, No-Taste Red, Kelly Green, White (optional)
- Two piping bags
- Two couplers
- Wilton tip #352
- Edible pearls (I used white and gold colored pearls)
- Cake spatula (a bread knife will do if you don’t have a cake spatula
- Mini cupcake wrappers. If using a chocolate cupcake recipe I highly recommend using foil wrappers (patterned cupcake wrappers tend to get soaked through and not show their designs very well when filled with chocolate batter).
- toothpicks
Instructions for Making Mini Poinsettia Cupcakes
First bake your cupcakes and let them cool completely. Then make your buttercream icing. Since we’re tinting the icing it’s best to stick with a basic buttercream or vanilla bean buttercream.
Divide your icing into three containers: 1 cup for white, 2/3 cup for green and 1 1/3 cup for red.
You want your white icing to be thin consistency and your red and green icing to be medium consistency. A spatula will fall over fairly quickly when placed upright in thin icing. For medium icing the spatula will fall over slowly. If the spatula doesn’t move then the icing is stiff and you need to add a little water, 1 teaspoon at a time, until it’s thin enough.
Next you want to mix your colors.
Mixing Your Icing
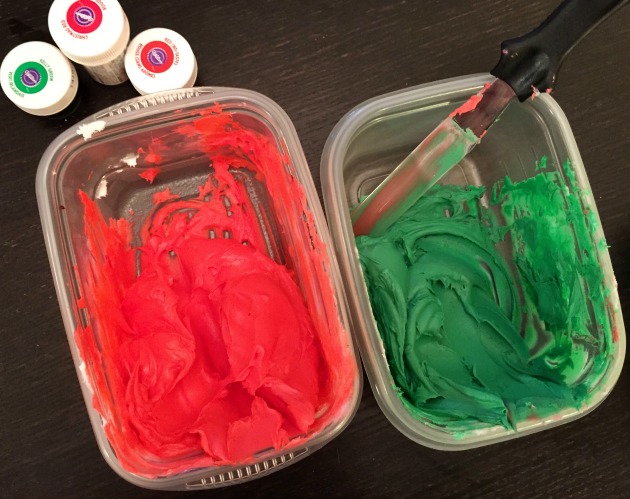
Make sure you’re using gel icing colors (like the Wilton colors mentioned above) rather than regular food coloring so that the consistency of your icing doesn’t change. If you like you can add some white icing color to it to make your buttercream snow white. Otherwise it will be a light cream color. Mine is very white because I used the Wilton decorator icing which is pure white.
Red one of the hardest colors to create so start with that one. You’re going to use a lot more icing color for red than you will for other colors. On the Wilton site they mention you may need 1 oz of color for 1 cup of icing to achieve a rich red. I didn’t use quite that much but it was a lot.
When you use large quantities of icing color it can result in a bitter taste. For this reason we are going to use No Taste Red in addition to Christmas Red (the Christmas Red is necessary to achieve a rich red color, you won’t be able to achieve this with No Taste Red alone).
I started with the Christmas Red and, using a fresh toothpick each time, I added color until the mixture was a bright hot pink. Then I added No Taste Red and kept mixing until I couldn’t seem to get the color any deeper. At this point it’s best to set the icing aside and let it settle a bit. The color will change as it rests.
Add your Kelly Green to the remaining 2/3 cup of icing and mix until you have a deep green. A little trick my Wilton instructor taught me is to add a little of the flower icing color to the leaf color to make them match up better to the eye. Let me tell you, this will totally make your green color work. I was really happy with my green but once I rinsed off my spatula, dipped it into the red and added a little into the green, it deepened the color and just made it pop.
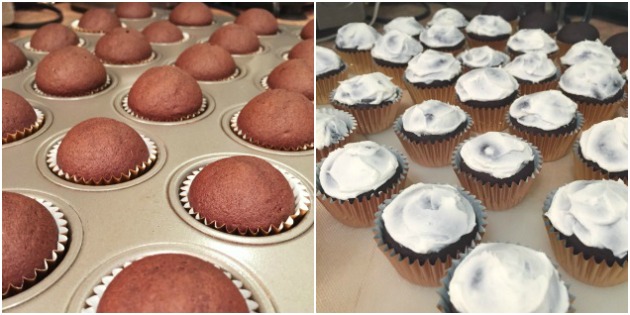
Set your red and green icing aside and use the white icing to ice your cupcakes. As you can see from the picture above I only did a crumb coat. I wasn’t sure how much was going to show through when I was done and I thought this would be sufficient. I recommend doing a thicker coat than a crumb coat because it looks much nicer (like freshly fallen snow). I selected the few with thicker icing for the remaining pictures.
By the time you’ve iced all the cupcakes your red and green colors should have settled and be ready for piping.
Piping Your Leaves
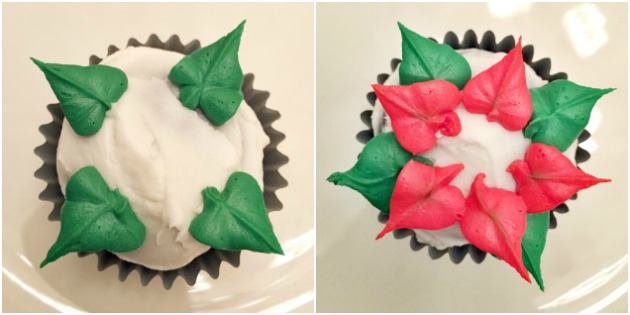
Prepare two decorating bags with couplers and fill one with your green icing and one with your red icing. Be careful not to overfill. Start with 1/2 cup in each bag so it’s easier to control. Attach the 352 leaf tip to the green and pipe four leaves onto your first cupcake. You don’t want to pipe the leaves right at the edge but you also don’t want to leave too much space for the red leaves. You’ll need to guestimate and not all will be perfect (but that’s okay, nature isn’t perfect either). You can see from the pictures below where I placed my leaves.
If you’ve never piped leaves before, don’t worry, it’s easy. Practice on a piece of parchment paper first. Hold your tip so it looks like a bird beak (you shouldn’t be able to see the “v” when looking down on it). Squeeze the bag of icing and let the icing anchor on the parchment paper. Keep squeezing until you get a wide enough base and then pull outward as you ease up on the piping bag. Stop squeezing and pull away to form the point. Keep practicing until you’re comfortable (you can scrape up the icing and put it back into your piping bag after).
Go through and pipe the green leaves onto all your cupcakes. If you’re like me and have hot little hands that melt buttercream icing, then take a break when needed and pop your icing bag into the fridge to let it firm up a little.
Once all the green leaves have been piped you’ll want to switch your 352 tip to your red icing bag. Squeeze to clear the green icing from the tip. Don’t worry if a little green icing remains in the tip. You’ll notice my first few cupcakes have a hint of green in the red which I think works well since real poinsettias have a little green in the red leaves too.
Pipe a ring of five larger outer leaves just inside the green leaves. If you need to add a sixth leaf to close the ring then go for it. Most of mine have five outer leaves but a few have six. Don’t worry about it, it’s all pretty.
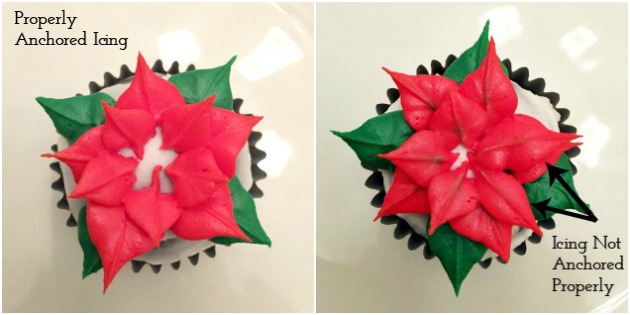
Next you will pipe five smaller inner leaves. With this step you need to make sure the icing is anchored securely before pulling up to create your little leaves. If the icing isn’t anchored properly it will stretch and instead of having cute little leaves you will end up with elongated leaves that are longer than the outer leaves. This happened to me the first few times I tried this. The issue is that because the inner leaves are small you expect it to take less time to pipe the leaves. But, because you are piping down into a circle, the icing has farther to travel before it makes contact with the base coat. You need to give it this time to make contact before you stop piping and pull up.
As with the green icing, if your icing heats up to the point where it’s difficult to control, take a break and pop it in the fridge.
Adding the Final Touches
Now you’re going to add the edible pearls to the center. I used both white and gold pearls. I found that my white pearls were smaller than the gold ones so I used them on the poinsettias with less space left in the middle and used the gold ones when I had more space to fill. Add as many pearls as needed to fill the center space. Some of mine only had three while others had four, five or even six. Drop the pearls as close to the center as possible then use a toothpick to jockey them into position and press them lightly into the icing until secure.
Now take some pictures and you’re done.
Tips for Making Full Size Poinsettia Cupcakes
If you’ve decided that you’d rather make regular sizes cupcakes then there are a few options for using this design.
The first would be to use a larger leaf tip (#366) and create a larger poinsettia in the center of your cupcake. Then you can either use larger candy balls for the center or pipe yellow or white icing with a number 3 round tip.
The other idea would be to use the same size poinsettias shown in this tutorial but do a cluster of three on your cupcake. Start with the green leaves and work your way in.
I haven’t tried either of these ideas on a full sized cupcake but these methods are what I would do.
Happy Cupcake Decorating!

Leave a Reply