I’ve been super excited to take Wilton Course 2: Flowers and Cake Design ever since I completed the first course, Building Buttercream Skills. From what I can see around the web the second course has been re-designed and the new format was implemented in 2014. Originally the course had an introduction to fondant for lesson one and then focused on royal icing for the remaining lessons. The way they have it now, which makes more sense to me, has lesson one and four building on the buttercream skills we learned in Course 1 while lessons two and three focus on royal icing.
One of the main differences between this course and the first course is that you don’t bring cake to class until the final week. The first class is an introduction, the second and third have you create royal icing flowers for your final project, a cake you will complete in lesson 4.
Once again I am the only student so this course almost didn’t run. There are plenty of students for the weekday classes but it seems to be my luck that weekend classes don’t fill up as regularly. Fortunately when the instructor found out I can’t take the course next month as it’s only available during the week she agreed to teach me. Yay!
Since it’s just me we’re condensing the timeline to three weeks but I’m still getting the same number of hours of instruction. This post covers lesson one, which I just completed, next weekend we’re doing a marathon four-hour session comprising lessons two and three and the final week will be lesson four.
What You Need to Complete Wilton Course 2: Flowers and Cake Design
Essential Items for the Course:
- Wilton Course 2 Student Guide. Make sure you buy this new version (the monochromatic violet floral cake) and not the one for the old course (white square cake with purple flowers).
- Wilton Course 2 Student Kit. Ditto for the course kit. The contents are different and you want to make sure you have the right materials for the new course.
- 1lb tub of Wilton Ready-To-Use Decorator Icing. You only need the decorator icing for the first class so this is the perfect size. The 1 lb tub comes in stiff consistency but you can easily thin it down to medium and thin consistency.
- Wilton Meringue Powder. This is an essential ingredient for royal icing and it’s sometimes called for in buttercream recipes as well. You can buy either the 8 oz or 16 oz containter (the 16 oz can is a better deal, this is the one I bought).
- Icing Sugar. You need 1 lb (450g) of icing sugar per recipe of royal icing and you need 3 – 4 recipes for the course (officially you need 1 recipe for lesson 2 and 2 recipes for lesson 3, but I made one extra recipe just in case).
- Icing Colors. For Course 1 I listed this as an optional item but for this course I consider it essential. It’s a really good idea to have your own colors especially because you will want to tint your royal icing ahead of lessons 2 and 3.
Items to Bring From Home:
- Pen and paper
- Scissors
- Toothpicks
- Squeeze bottle for water
- Containers for mixing icing
- Plastic bags or containers for storing piping bags and tips that aren’t in use (so the buttercream doesn’t crust and block the tip).
- Bowl, spatula and hand mixer (if your instructor wants you to make the royal icing during the first class, if not then bring this to lesson 2).
Royal Icing
Although the course focused on buttercream for lesson one my wonderful instructor asked me to bring in the ingredients for royal icing and my hand mixer so we could make the first batch in class in preparation for next week. I’m so glad we did this. I’ve only worked with royal icing once before and have to say I’ve found it to be a bit intimidating. I used Wilton’s Royal Icing Mix and apparently I didn’t make it right. Making it from scratch and under instruction was very eye opening. The main thing I took away is that is requires a lot of mixing to get it right. Eight minutes of mixing to be exact. You have to time it. And it’s hard work because you use very little liquid and rely on your mixer to achieve the right consistency. If you want strong pipes, forget going to the gym. Just make several batches of royal icing with a hand mixer.
Introduction
Once the royal icing was out of the way went back to the lesson plan.
Color Wheel – Since cake design is a main focus of Wilton Course 2 it’s only natural that the color wheel receive some attention. We reviewed the principles on page 5 of the course manual discussing complementary, neighboring, triad and monochromatic color selection.
Making a Parchment Bag – I was really glad that we reviewed this technique. I got to see a demo in my condensed course 1 class but didn’t get to try it out myself. So I got to make a parchment bag and use it with a coupler. I had no idea you could use a coupler with it, so you learn something every day.
Lessons in Buttercream
This class was pretty fast-paced so I don’t have many photos taken in class. But I did take some during my practice sessions at home.
Cornelli Lace – With my newly constructed parchment bag fitted with tip two and filled with thin consistency buttercream icing I got to practice the lovely cornelli lace pattern first over top of the template and then free-form on a cookie (supplied by the instructor).
Brush Embroidery – I love this technique. With tip 3 and medium consistency buttercream icing I practiced with a five petal flower template. Working one petal at a time so the icing doesn’t dry out I piped an outline and then brushed the lines toward the center with a damp decorator brush.
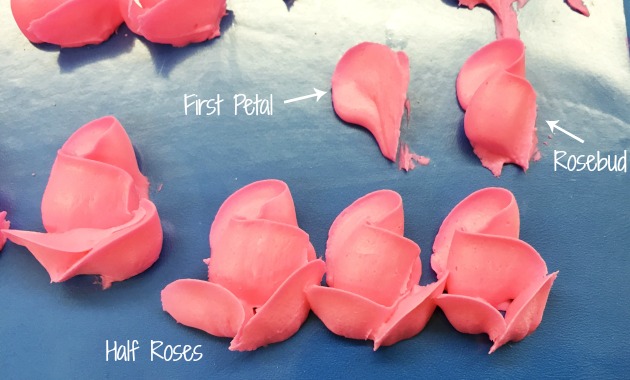
Petals and Roses – Next I was shown how to make petals and then the rosebud and half rose from lesson 2. We skipped the blossom but I think we’ll come back to that in lesson 2. At first I was a little overwhelmed with all the information and techniques shown to me all at once but I did get plenty of time to practice.
One thing that really helped me was my instructor held onto my decorating bag with me. I was in charge of pressure and she controlled the direction we were piping in. This was very effective to feel how the decorator bag should be moved in order to make the shapes properly. But even with this help I found the rosebud, rose and petals to be very hard to make and it took me lots of attempts to get them looking somewhat decent.
Here are my best ones from class:
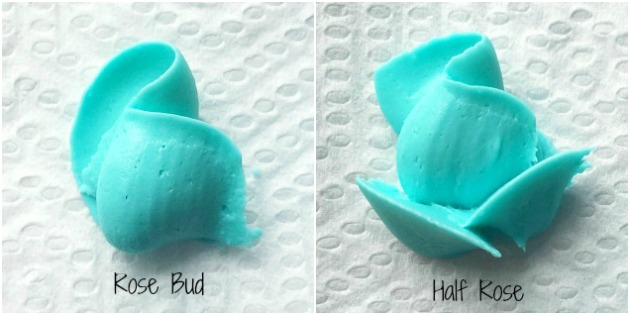
I’m really glad I was taught these flowers from an instructor. I read the instructions for the rosebud in the course manual and although all the steps were mentioned I didn’t ‘get it’ until I had experienced it. I still had no idea how to form the top petal so it wrapped around the bottom petal. Guess what? You don’t have to. It happens all by itself. After you make the first petal, you place your tip under the right side of the petal and then squeeze your icing. The icing flows out, catches the edge of the first petal and carries it with it causing it to curl. The trick is to get the right pressure and pipe fast enough so your top petal doesn’t look bulky. For the half roses you just add two additional petals to your rosebud.
These are my two best after much practice at home:
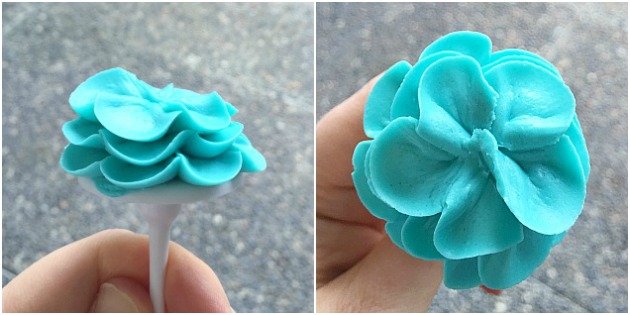
The flower I had the most trouble with was the one formed by concentric petals on page 9. In your manual you’ll see this beautiful creation on a cupcake formed by three overlapping rings of perfectly and evenly formed petals. For me this was way easier said than done and needless to say I didn’t create any photographic evidence of my first failed attempts. But it’s something worth learning because many of the flowers taught in lessons 2 and 3 are built with similar petals. I hope I’ll have better luck working with the royal icing because a main issue hindering my petal formation was sticky icing made worse by my hot hands.
This is my best flower. I found it very hard to work on a cookie but much easier working on the flower nail. (I had to pat down the edge of my final petal because the sticky icing clung to my tip and ended up all pointy).
Preparation for Lessons 2 and 3
I had prepared the royal icing for lesson 2 in class but was instructed to prepare another two recipes for lesson 3. I was also instructed to come to class with my icing already tinted and made to the right consistency so we could maximize our class time. My teacher also suggested I bring extra icing sugar to class in case I need to adjust my consistency.
Planning Ahead for the Final Cake – Since the flowers made during lessons 2 and 3 will be used on the final cake it’s a good idea to really think about what colors you choose. This is something I’ve been thinking about for a while. I’ve read a lot of reviews for this course and seen a lot of pictures of final cakes and one thing that really strikes me is that many students use way too many colors and it detracts from the beauty of their final cake. I think this comes in part from not thinking ahead for this final cake and getting carried away while having lots of fun trying out colors for each of the different flowers. Also, although the student guide tells you what colors to mix for each flower you don’t have to choose these colors. You can adjust and go according to your own color scheme.
It’s a really good idea to revisit the color wheel when choosing your color scheme. If you find it hard to work from the color wheel, then start with the internet. Search Google or Pinterest for floral cakes and then see what strikes you. You may find yourself attracted to certain colors or color combinations. Take this back to your color wheel and see how these colors relate. You can make any adjustments if necessary and then you have a solid plan for your final cake.
Another thought for your color selections: you don’t want all your colors dialed up to “10” in terms of brightness. If you like bright colors then choose one color to make in an intense shade to serve as a focal point or to create pops of bright color and then have your other colors appear in pale to medium intensity.
I’ll share my color scheme in the next post.
Final Thoughts
Although this is just the first class for Wilton Course 2, my impression is that this course is going to be much more challenging, faster paced and a lot more work than the first course. You’ll need to make sure you have extra time outside of class hours to make your icing and practice the techniques. The flowers are a lot more intricate and require more precision than the piping techniques learned in the first course. That being said, I am extremely excited to be learning these skills and am very impressed with my instructor.
Read Part II: Lessons 2 and 3.


In the Wilton Course 2 student guide- do the instructions say to make the half rose and rosebud in buttercream icing or royal icing? Or both?
In the course guide the rosebud and half rose are completed in lesson 2 and it says to use royal icing. We skipped ahead in lesson 1 and practiced these using buttercream. You can definitely do this technique with either but it will be a lot easier to transfer to your cake if you use royal icing.
Is it okay to eat flowers and other decorations made from royal icing? I want to eat the decorations. That’s why I prefer to make them out of buttercream icing.
You can absolutely eat royal icing decorations (although if you have an egg allergy you won’t want to since royal icing is made with meringue powder). However since royal icing dries hard the decorations are harder to eat and thick flowers (the lily and poinsettia) are too hard to eat. Personally I also find royal icing to be very sweet so I can never eat more than one decoration anyway. While buttercream decorations will remain soft and nicely edible there are two reasons to consider using royal icing decorations.
1) Time. You can make royal icing decorations weeks/months in advance. If you have a deadline coming up it’s great to make your flowers in advance. It’s also nice to have a little stash on hand to easily decorate last minute cupcakes.
2) Design. Royal icing is much lighter than buttercream so you can apply appliques and full or half roses to the sides of your cake (such as done on pages 13 and 14 of the course 2 manual). If you tried to apply a buttercream Wilton rose to the side of your cake it would slide off due to the heavy weight and most likely the petals would be damaged during it’s application.
Hope this helps 🙂
I heard that the wild rose, lily, violet, apple blossom, Wilton Rose, rosebud, half rose, pansy, and poinsettia will all be taught in royal icing in WIlton Course 2.
I prefer to make those flowers with buttercream icing. Those techniques used to make those flowers with royal icing- could I use those same techniques to make those same flowers with buttercream icing?
You can absolutely make those flowers with buttercream. Just make them on a parchment square on a flower nail as you would with royal icing then slide the parchment off onto a bigger board such as a cutting board or your practice board. Pop them into the fridge for at least 15 minutes to let them firm up (leave them longer if not firm enough) and then using a tapered spatula lift them gently off the parchment and place onto your cake or cupcakes using a dollop of buttercream to glue them in place. You can use a toothpick to help position them.
I much prefer the taste and texture of buttercream myself. But, the advantage of royal icing is 1) being able to make your decorations well in advance and 2) they are lighter weight so you can add larger flowers to the sides of your cake without them falling off.