‘Cake Day’ always fills me with excitement and the final class for Wilton course 3 was no exception. If you haven’t read it you can find the first part of my review covering lessons 1 – 3 here.
Covering a cake with fondant is an essential skill to have if you want a really polished look. So naturally I was both excited and anxious for this class.
I had multiple problems during lesson 4 and spent much of the class referring to my cake as ‘Disaster Cake’. But it still turned out pretty well, different than planned but still visually appealing. From this you can take away that even when everything is going wrong you can always find a fix for the problem.
What You Need for Wilton Course 3, Lesson 4
- Large Rolling Pin with Rings
- Fondant smoother
- 8″ cake iced with buttercream on a 10″ cake board (you can trim this down a bit but leave some room for your border).
- Fondant
- Icing Colors
- Your flowers
- Royal icing (needed for attaching flowers to your cake, your instructor may provide this so check with them during lesson 3)
Optional
- Fondant Trimmer (you can also use a pizza cutter or a knife).
- Silicone molds for a fancy border.
Lesson 4: Covering the Final Cake in Fondant
You need to bring an 8″ layer cake iced in buttercream to your final class. It’s also a good idea to pre-color your fondant prior to the final class (refer to the Wilton Fondant Coverage Chart to see how much you need). This gives the color time to settle so you can adjust it if necessary and it will help maximize your class time.
I had two major issues that caused problems while covering my cake with fondant. These can both be easily dealt with during your preparation for the class.
Problem #1: Buttercream Oozing Everywhere
I applied a liberal coating of buttercream a few hours before the class (normally I would have made the cake the day before but it was a busy week…). Then, since class was just a few hours away, I put the cake in the carrier and left it at room temperature. Do not do this.
For best results your cake needs to be chilled for at least a few hours. Firm buttercream doesn’t ooze.
My instructor suggested only applying a crumb coat when covering with fondant. I did this in Course 4 with much better results. But I love my buttercream and would like a little more there after I peel away the fondant. I suspect a thicker layer would be just fine so long as it’s smooth and chilled. I’ll let you know when I test this out.
Problem #2: Dry & Cracked Fondant
When I colored my 50/50 for lessons one through three I used lots of shortening every time it got sticky, but this made the 50/50 a bit thin and hard to work with. So when I colored my fondant I didn’t want to make the same mistake. I used a bit of shortening and lots (and I mean lots) of icing sugar. Don’t do this.
Fondant behaves differently than 50/50 and can easily dry out. When this happens it will crack and tear as you cover your cake. Only use shortening when adding color to your fondant.
Fixing the Cake
When I covered the cake with my fondant it immediately began to tear and crack. As I ran the fondant smoother over the top I could feel the buttercream oozing underneath. As I secured the fondant at the base, the buttercream oozed out the bottom.
I cut off the excess fondant making sure to keep the ‘good’ fondant in one pile and discard the fondant that was covered in buttercream.
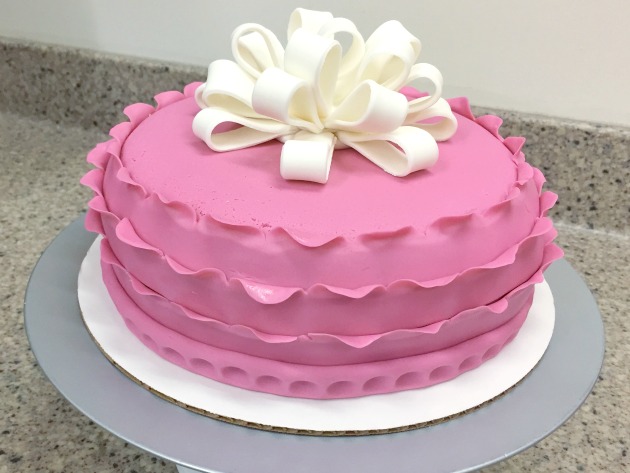
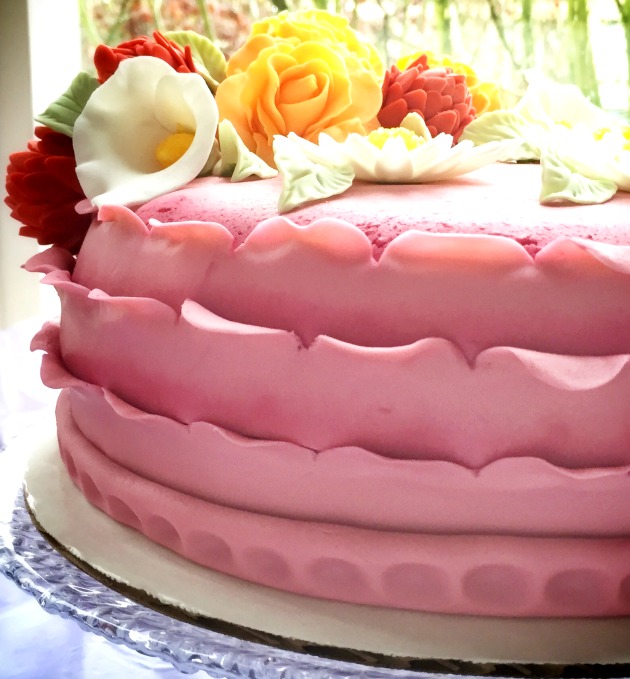
Adding shortening to the leftover fondant helped a little to rehydrate it. Then, to cover most of the cracks along the side of the cake, my instructor showed my how to make ruffles. This was part of lesson 3 but we had skipped it so it was nice to try it out. My instructor suggested applying the ruffles upside down so they looked like petals.
I did three rows starting at the top and working my way down. The ruffles were attached with edible glue (made from 50/50 and water).
I forgot to bring my silicone mold to create a pearl border but it was just as well. This cake required a more substantial border to act as a retaining wall for the buttercream. I rolled out long tubes of fondant to create a rope border and used my ball tool to create indentations that made it look like a reverse pearl pattern. Keeping the tube size consistent was a challenge.
The photo above with the bow on top shows the cake at this stage. The bow was just placed on top for the photo, no royal icing was used to secure it.
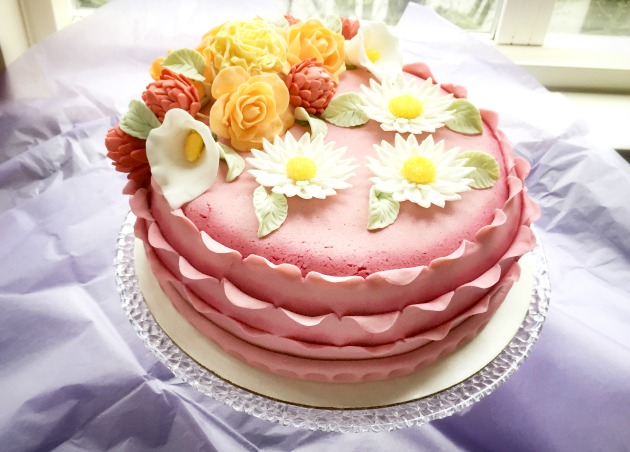
Next I arranged the flowers and leaves on top. The mums and roses were attached by sticking the toothpicks into the cake and the others were secured with royal icing.
The final step I took to help disguise the cracked fondant was applying a thin coat of deep pink color dust with a dry paint brush. I applied the color around the top edge of the cake and around the bottom part of each petal layer. It didn’t make the cracks completely disappear but it created a nice shaded appearance that tied the color scheme together nicely. The picture with the bow was taken before I applied the color dust so you can see how it transformed the cake when compared with the pictures with the flowers (the lighting for the intro photo shows off the petal dust the best).
Conclusion
I thoroughly enjoyed Wilton Course 3. Compared with Course 2 it was more relaxed but still fairly quick paced. I learned so many new techniques and it was especially valuable to learn that even when things are going wrong you can save the cake by taking a different approach.
One issue I have, though, is with the course manual which jumps all over the place. The way they have set it up makes perfect sense for the way the classes are layed out. You make part of one flower, then move on to the next while the first dries, then you make the next part of the first flower, then move onto something else while that dries.
But, when you come back later wanting to make one specific flower, it feels like a scavenger hunt trying to find all the instructions through the manual for that one flower. I would have preferred it if they had kept all the instructions for each flower separate but indicated that you needed to take a break to allow for drying time.
Aside from that, which is really a minor issue, I think this was an excellent course and I would highly recommend it.
Stay tuned for my review of Wilton Course 4: Advanced Gum Paste Flowers.


I love this cake and really want to make it as my final cake for this course! Can you tell me the color names you used for the fondant and flowers?
Hi Amanda, thanks for the comment. I used Wilton Gel Colors for everything. Some of the colors were straight out of the jar and others I kept mixing until I felt they were right. This color guide was a great jumping off point for mixing colors.
Daisies and Calla Lily Petals: Straight up 50/50, didn’t use any additional white gel color.
Carnation & flower centers: Golden Yellow.
Leaves: Moss Green.
Roses: Mixed Orange with a little Golden Yellow and Pink. The yellow adds warmth and the pink makes it interesting and pretty.
Mums: I was going for a rust color. I always find reds challenging and I usually don’t like them until they’ve settled for a day. This was no exception. I used No Taste Red, Orange, Brown and I believe I ended up using some Christmas Red as well. It looked terrible when first mixed but much better after it settled. To create the variegated look I mixed half of the rust red with white 50/50 to create a lighter color and then half of this with more white 50/50 so I had three shades of rust.
Cake Fondant: I was going for dusty rose. I started with Rose and Violet but I had to add some other colors to get the tone I wanted. I’m not 100% sure but I may have added a little No Taste Red and possibly a little Golden Yellow and a little Orange to tie it all together.
Hope this helps 🙂 Best wishes for your final cake. If you blog about it feel free to drop the link in the comments, I’d love to see it 🙂
That was so helpful!!! My cake come out great!! I plan on making a blog post about it (eventually.. I’m behind!) and I will definitely link back to here since I followed your directions to a T. thanks again 🙂
That’s great! I’m glad everything worked out 🙂
Hi Tara… I can’t find your instagram name, do you have one? I’m taketwotreats and i wanted to tag you/ give you a shout out in my final cake pic so you could see it!
Hi Amanda, I don’t have an Instagram account dedicated to this blog yet but here’s my personal Instagram. Congratulations on your cake, I’d love to see it 🙂