Do you like play dough? Do you like cake? Great! You’ll love Wilton Course 3 as much as I did.
This class was so much fun and so rewarding. I love the polished look that can be achieved when using fondant.
But be warned. This course is where your cake addiction truly begins. There are lots of cool techniques you can learn with buttercream and royal icing but once you get a taste of working with fondant the sky is the limit. There will also be a never ending list of cake decorating tools you will covet and yearn to buy.
For course 3 I was once again the only student and my teacher made an exception and agreed to teach me on my own. There are plenty of students in the other weekend classes and I think the fact that I’ve been solo for Courses 1, 2 and 3 can be attributed to my December start date (you know, most people scrambling to get ready for the holidays and not available for a cake class).
I’m going do things a little differently and tackle this review in two posts. This post will cover lessons 1, 2 and 3 and the second post will cover lesson 4. The reason for this is because we skipped around a lot in the lesson plan in order to accommodate our schedules (my first class was a four hour class that worked through lesson 1 and part of lessons 2 and 3).
I learned a lot during this course, especially through my mistakes. Actually, let’s not call them that. Let’s call them ‘learning experiences’. Throughout this review I’ll share these experiences and what I learned from them so that you can have a head start when you take course 3.
What You Need for Wilton Course 3
- Course 3 Student Kit
- Course 3 Student Guide
- Wilton Ready to Use Gum Paste (1 package, possibly a second pack depending on how many flowers you make and different colors used).
- Fondant (the course guide suggests you buy the small package of fondant but the larger package is more economical, especially if you plan to make more cakes in the future).
- Wilton Roll and Cut Mat
- Icing colors
- Toothpicks
- Vegetable shortening
- Icing sugar
- Cornstarch
- Small containers with lids for vegetable shortening, edible glue and gumpaste scraps.
- Cling wrap, ziploc freezer bags, large tupperware container.
Optional
- Gum Paste Tool Set. You can get away with not buying this for Course 3 but some of the tools come in pretty handy for Course 4. My course 3 kit was missing the veining tool (and I didn’t notice until after I’d washed everything so I couldn’t exchange the kit) so I bought this set. I especially love the mini palette knife and the tweezers.
- Daisy Cutters
- Wilton Yellow sparkling sugar for the daisy and calla lily centers (you’re instructor may provide this but it’s great to have your own if you make additional flowers at home).
- Medium Flower Forming Cups (comes in a 6-pack with 3 small and 3 medium cups)
- Candy cups
- Ribbon Cutter Set
A Few Words About Fondant and Gumpaste
The course manual has very specific ideas about when to use gumpaste on its own and when to use 50/50 (a mixture you create by kneading together equal parts fondant and gumpaste). The truth is that gumpaste is much more expensive than fondant and in order to extend your supplies it’s perfectly acceptable to use 50/50 for all your flowers (even when the manual instructs you to use straight gumpaste). Two pouches of gumpaste and one large box (5lb) of white decorator fondant got me through both courses 3 and 4 with some leftover.
50/50 Mixture
Adding gumpaste to fondant creates a medium that dries faster, firmer and holds its shape better than fondant alone. However,this mixture should only be used to create flowers or other decorative elements that won’t be consumed (gumpaste is edible but dries very hard so, much to my husband’s utter annoyance, it’s not recommended you eat the gumpaste creations). When covering a cake, ensure you are using straight fondant and not your 50/50 mixture. It’s a good idea to store your fondant and 50/50 in separate containers so you don’t accidentally mix them up.
When coloring 50/50 you may find the mixture becomes tacky and sticky. Working in some shortening or your cornstarch/icing sugar mixture will help when this happens. I recommend alternating between the two because if you only use shortening your 50/50 will become too thin and will be hard to work with later (this was one of my mistakes learning experiences).
Fondant
Fondant on its own is ideal for covering a cake and for creating design elements that don’t need to be rock solid.
When adding icing colors to the fondant, similar to the 50/50 it may become sticky or tacky. Only use shortening to fix this. Do not, I repeat, do not use icing sugar or cornstarch. I made this mistake and it resulted in very dry fondant that cracked all over my cake.
Storage
Fondant and 50/50 must be stored properly to ensure a long shelf life. Keep all your colors wrapped up and only remove what you need. Place the scraps back as soon as possible. When you’re done, rub a thin layer of vegetable shortening over each ball of fondant or 50/50, wrap it in cling wrap (secure the edges to keep air out), put the cling wrapped balls in a ziploc freezer bag (use one for fondant and one for 50/50 to keep them separate), then remove as much air as possible (I often suck out the excess air with a straw), and place the bags in a large sealed container.
Flowers and Bows – Lessons 1, 2 and 3
Preparation for Class 1
Before you’re first class it’s always a good idea to think about your color scheme. This way when it comes time to put everything all together you know all your flowers will coordinate nicely.
Prepare your edible glue. I use a small 115ml container and place 2-3 pea-sized portions of 50-50 (you can use straight gumpaste too) in approx 2-3 tablespoons of hot water. Within an hour the gumpaste will dissolve, the water will cool and you’ll be left with edible glue. I usually swirl the mixture around a few times while its cooling.
Mix 1 tablespoon each of icing sugar and cornstarch and add to your dusting pouch.
Bows
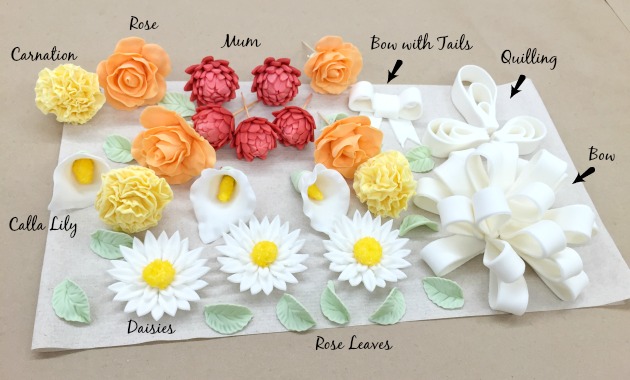
You will be making three types of bows: a bow with long tails, quilling and a large present bow. Your course manual suggests bringing a ruler to class to measure out and cut the 50/50 into strips. Fortunately my instructor brought her ribbon cutter which made this job so much faster and easier. I was so impressed with how easy this process was that I bought a ribbon cutting set right after the class.
I made my strips 1/2 inch wide for all the bows which I think looked nice but for the bow with tails and quilling I think a 1/4 inch width would look nice and dainty. For the present now I think the thicker widths are nicer for a fuller bow. I liked the look with the 1/2 inch width but next time I’m going to try it with the 1 inch width.
You will make all your loops is class one (and prop them open with rolled up paper towel) and leave them to dry until class two. When you put the present bow together you will cut off sections to create a point. Keep these scraps in a container so you can use them to make edible glue for future projects.
We assembled the present bow differently than in the manual and I think it turned out really nice. Instead of starting with a ball center and sticking all the loops to the ball, the 50/50 was rolled out to 1/4 inch thickness and the medium round cutout was used. Seven loops were attached to this circle. Then I rolled the 50/50 out using the pink guide rings and made another medium circle cutout and a small circle cutout. The medium cutout was placed over the first cutout and six loops were attached (and bent upwards a little, held in position with scraps of paper towel. The small cutout was layered on top and another 6 loops were added and held in place with paper towel. One final loop was positioned upright in the middle.
Daisies
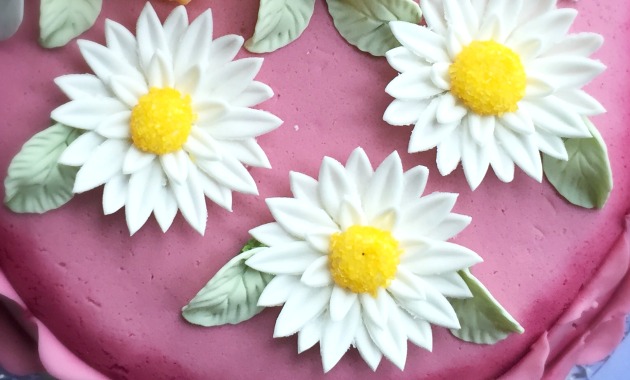
The daisies are a really fun, simple and elegant flower to make. You can make them using the mum cutters that come with the course 3 kit or you can purchase the daisy cutter set. The difference is that the mum cutters have slightly more rounded points and are very similar in size wheras the daisy cutter set has more pointed tips. The daisy cutter set also comes in a set with three sizes so you can make larger daisies (make two cutouts with the large cutter and one with the medium cutter (pictured below)) or smaller daisies (use the medium and small cutter). If you do go ahead and buy the daisy cutter set it’s also a good idea to buy the medium flower former cups so the flower will have the right curvature. Using yellow sparkling sugar on your centers (dip the centers in edible glue then roll in the sugar) really makes the daisies pop.
Roses
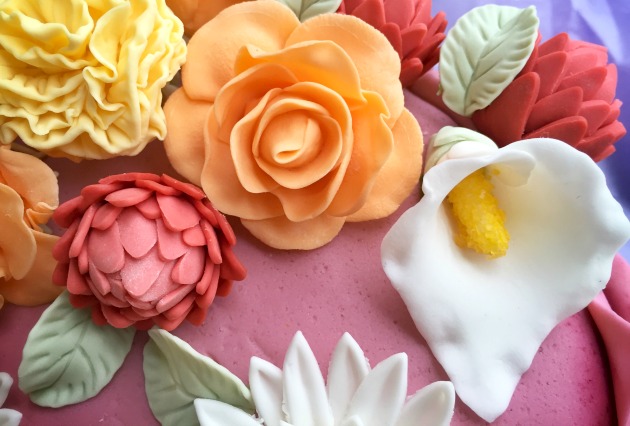
I loved making roses but sometimes felt like I could use a third hand. Whenever I felt like this I turned the flower upside down so that gravity could help out as I arranged the petals. When the rose had only one or two layers of petals I placed it in a candy cup to help hold it together until the edible glue dried. When the rose was complete I used the small flower former to help hold it together.
For both the rose and the mum we used a toothpick instead of uncooked spaghetti stuck into the flower base. I have mixed feelings about this. On the one hand I don’t like sticking non-edible items into my cake and having to warn people to watch out for the toothpicks (in fact my husband’s co-worker joked that she would choose me to be paired up with during a zombie apocalypse with my confections filled with hidden weapons). On the other hand I’m not sure how to go about sticking roses onto the side of a cake without some sort of structural support such as a toothpick (not sure if edible glue or royal icing alone would be enough to secure them). If you’re placing your roses and mums on top of your cake, as I have done, then perhaps use the spaghetti and then snap it off before using royal icing to attach the flowers.
But overall I love the look of the fondant roses. One final tip though, when you’re using the ball tool on the petals with the thin foam mat, beware of the hole in the center of the foam. If you roll the petal over this you’ll have a pointy irregularity on your petal.
Mums
I really liked the making the mums but I’m always amazed at how long they take. I decided to do a somewhat variegated look like the mums on page 21 in the manual. To achieve this you will need three colors and will make six cutouts. The mum cutters are slightly different sizes so use the small cutter to make two of your center color, make one small and one large of the next color and two large of the outside color. Tip – try to ensure you roll out your 50/50 evenly for all your mums. I rolled out my 50/50 thicker when I was at home and accordingly the two mums I did at home are much larger than the three I did during class. Of course, if you want to have a range of sizes then this is how you do it 🙂
Calla Lily
I adore calla lillies! I made several attempts in my younger years at keeping calla lily plants but they always died on me. Perhaps this is a more feasible way for me to enjoy the beauty of the calla lily? This flower is so beautiful but does take a little practice to get the alignment right (I’m still working on it). One thing you have to be careful of is where you put your gum glue since any surface it touches becomes super shiny. My instructor had me roll out the yellow 50/50 for the center with the pink guide rings instead of the purple so the center would be a little smaller and more proportional.
Carnations
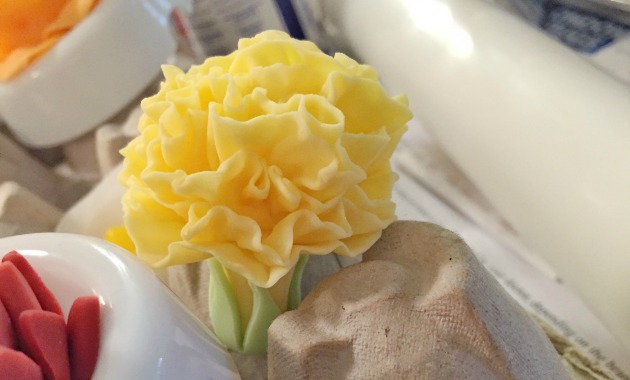
Despite being a January gal carnations are not my favorite flower. However I do think it’s really cool that you can make realistic carnations out of 50/50 with little more than a veining tool. My instructor showed me one extra step to finish off the carnation. I took the rose calyx cutter, made a calyx and attached it to the base of the carnation. I think it finishes it off nicely. I wasn’t planning on using the carnations on my final cake but at the very end one made it on there.
Leaves
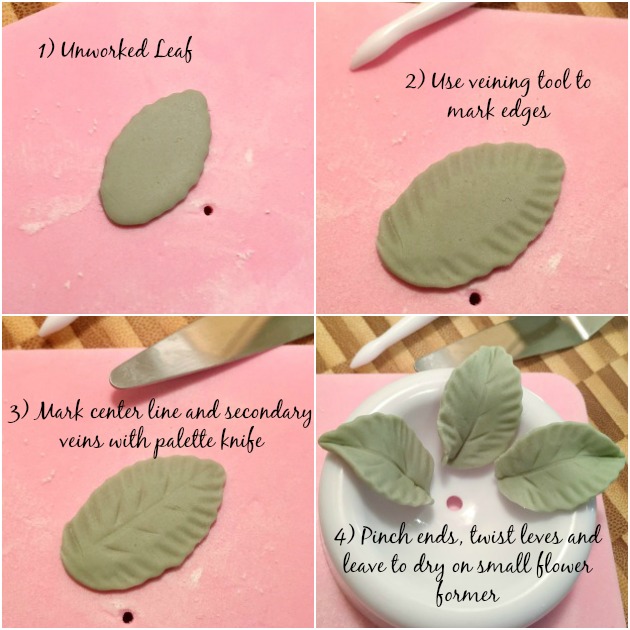
The leaves are a fun way to add little accents to your floral bouquet. It always amazes me how you can take a plain old piece of 50/50 and with just a few markings transform it into a realistic-looking leaf. Check out the transformation:
Pretty neat huh?
These bows and flowers were so much fun to make. Stay tuned for the next post where I put it all together and create the final cake.

What are your thoughts about taking corse 2 and course 3 simultaneously? Courses 1 and 2 are buttercream only and course 3 is fondant and gum paste. Since they are completely different mediums, do you think someone would be successful taking course 2 and 3 simultaneously after taking course 1?
Great reviews of the courses
Hi Chris, thank you. Course 2 is both buttercream (lesson 1 and 4) and royal icing (lessons 2 – 4) so it’s true these skills aren’t necessary to complete course 3. The one thing to consider though is whether you have the extra time to take both courses at the same time. I found course 2 to be very demanding and I spent a lot of extra hours outside the class practicing the techniques. While course 3 wasn’t as demanding I still needed to complete extra flowers on my own time. So if you have the time to put into the courses then you will have no problem taking these classes concurrently. But, if you’re short on time then you will get the most out of them if you take them separately.