Wilton Course 4, Advanced Gum Paste Flowers, was an amazing and challenging experience. Building on the skills learned during course 3, as the course title suggests this course takes your gum paste flower making skills to the next level. Using florist wire and tape you will create a floral arrangement to adorn your fondant covered cake. This class opens up a world of confectionery possibilities and if you’re like me you will find yourself walking down the street looking at flowers and visualizing how to go about making them.
Although usually a four week class we completed this course in three two-hour classes. I made a few extra flowers at home but the bulk of the work was done during class time. This was my very first class with other students which was lots of fun. I just love seeing how although everyone uses similar techniques they come up with a completely different finished product.
This class was challenging for me though because I had a very bad cold. The class was offered on a weekend and I didn’t want to miss the opportunity and have to wait several months before the next weekend offering. I had already been sick for a week leading up to the first class so I figured if I could medicate myself enough to get through it I would be well on the mend by the second class. Wishful thinking. I developed an ear infection (wtf? haven’t had one since I was a kid) and after nearly a week on antibiotics my ear was still completely plugged up and I still felt crappy for the second class. But once I got started making flowers I completely forgot about being sick and just focused on my work. By the final class I was finally on the mend and having a great time.
For the final cake I put all my words of wisdom from my Course 3 review to use and I was very happy with the results.
What You Will Need for Wilton Course 4
- Course 4 Kit
- Course 4 Manual
- Wave flower former from course 2
- 9″ fondant roller from course 3
- Flower forming cups from course 3
- Wilton Roll N Cut Mat
- Wilton color dust: Goldenrod, Deep Pink, Lime green and Spruce Green
- Fondant
- Gumpaste
- Icing colors
- Cornstarch, icing sugar
- Vegetable shortening
- Toothpicks
- Edible glue
- Scissors
- New paint brushes and pallet (final class)
- Cake Flower Spike (final class)
Optional:
- Gum Paste Tool Set
- Silicone Fondant Molds (for final cake)
- Large flower forming cups
- Needle nosed pliers
- Wire Cutter
Preparation
As I have said with course 2 and course 3, it’s a great idea to think about your final cake design before you start lesson 1. Search Google for Wilton Course 4 cakes to see what others have done and to get an idea of what you like and what you don’t like. Think about what color your cake will be so you can choose flower colors that will go well with your base color.
But, remember that you will be applying color dust to most of your flowers so keep the base color light so the shading will be noticeable.
Generally, the gerbera daisies don’t make it onto the final cake because there just isn’t enough room. So if you want to use some bright colors then you can freely do so with this flower.
Although this course is called ‘Advanced Gum Paste Flowers’ you can make all these flowers with the more economical 50/50 (half fondant half gumpaste) blend. Coming prepared with your 50/50 already tinted will give you more time to make your flowers.
Throughout all the courses I have always made extra flowers. For this course I didn’t have time, except for a few extra blossoms, and this was just as well because applying the color dust and wrapping each wire with florist tape takes time. If you’re not happy with how your first attempt at a flower turns out, then by all means make another. But you may not want to make too many extras of each flower just for the sake of making more because you most likely won’t have time to finish them all in the designated class time and you won’t be able to fit them all into one cake spike.
My Color Guide
For anyone that’s interested, these are the Wilton gel colors I used:
Cake Fondant – Teal
Leaves, Calyx – Juniper Green
Sweet Pea & Flower Centers – Buttercup Yellow
Briar Rose, Stargazer Lily, Stephanotis – white (no tint)
Blossoms – Aster Mauve
Gerbera Daisy – Mix of Aster Mauve, Violet and Rose (and I suspect I added some No Taste Red)
Making Advanced Gumpaste Flowers
As I mentioned above this was a semi-condensed course. Lessons 1, 2 and 3 were combined into two lessons and lesson 4 was completed in the final week.
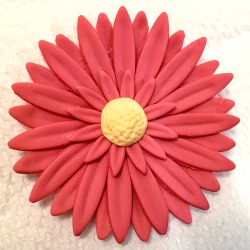
Gerbera Daisy
 I just love looking at gerbera daisies. Their size is impressive and they come in some pretty amazing hues. I only had time to make one so I just used one color but if you have more time you can experiment with using more than one color creating variegated layers.
Making the gerbera daisy is pretty much the same as the daisy in course 3, only larger. It’s also the only flower you will make in this course that isn’t attached to florist wire.
I bought the large flower forming cups for this and I highly recommend them. But, if you don’t want to buy them then you can MacGyver a drying mold with either a small disposable bowl or loosely place cling wrap over the opening of a disposable beer cup. Just make sure to apply a liberal coating of cornstarch before you place your flower on the surface.
You will need the medium flower forming cup to let the small layer of petals firm up a bit before adding to the larger layers.
The flower center is formed by using the appropriate mold on the impression mat.
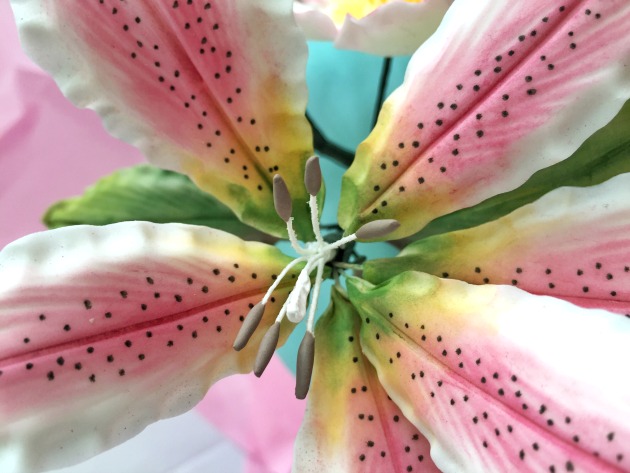
Stargazer Lily
The stargazer lily leaves and petals use an interesting technique where a flap is created and then folded over the florist wire. That little groove on the back of your impression mat that you may have overlooked (I certainly did) is actually a tool that you will use to create this flap. When you roll your 50/50 over the groove the flap is created. Flip the 50/50 over and position your cutter over the flap so that it goes up 2/3 of your petal and is slightly left of center. The you can brush a small (less is more) amount of edible glue along the flap, insert your wire and fold the flap over the wire. Next you’ll use the impression mat and then the ball tool and veining tool to create a more realistic petal / leaf. You will use your wide lily cutter to make three large petals and your narrow lily cutter to make three small petals and three leaves. Place them on your wave flower former to dry.
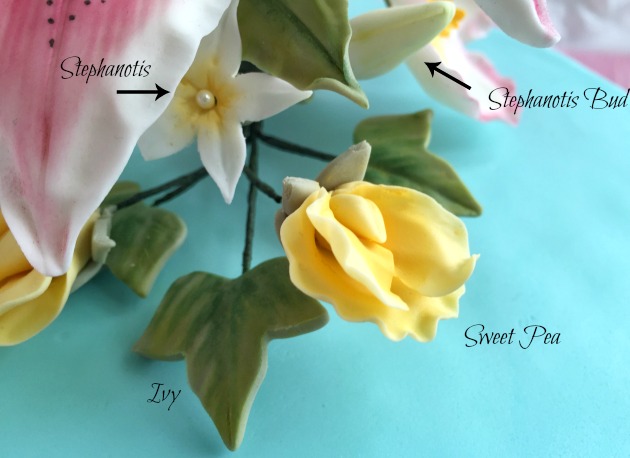
Ivy Leaves
The ivy leaves are made using the flap technique just like the stargazer lily leaves. You will use a different area of the impression mat to create texture and then leave them on the wave flower former.
Sweet Peas
I found the sweet pea to be the most challenging flower. You’ll make the flower center one week and the petals the next. If you were making a cake with lots of sweet peas then you could do them like a production line and do one step at a time. Since you’re only making 2-3 flowers you’re going to have to wait a little bit between adding the first and second petals for best results. I also suggest that less is truly more when it comes to adding the glue. I added too much and I felt like everything was going to fall apart on me. When you add the second petal you may want to use a few small pieces of rolled up paper towel to create space between the petals.
Stephanotis
The stephanotis is a flower I had never heard of but I’ve quickly become a fan. For me the buds were the most challenging part. They require a little finesse and I made an extra one to replace my first one that I wasn’t happy with.
The stephanotis flowers are beautiful and an extra tip my instructor showed me was to pinch them closed around the pearl stamen. This makes them look tidier and more elegant.
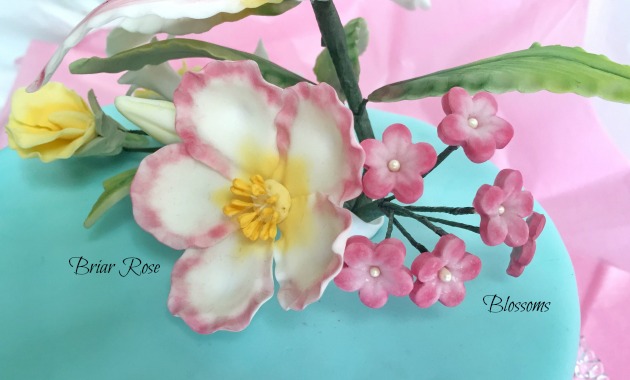
Blossoms
The blossoms are really sweet. But they are a little challenging to get started. You almost need a third hand to help keep the pearl centre aligned with the wire as you wrap it with the florist wire. Keep practicing and it will get easier. I did make a few extras of these because they look really nice in a bundle on your cake.
One tip I can offer is to make your cutouts and use the impression mat, then leave them to harden for 5-10 minutes before inserting the wire. This will help ensure they don’t fall apart on you.
Briar Rose
I really liked the briar rose. The center is kind of fun and crazy with 14 individual stamens. You’ll need your flower forming cups from course 3. I used the larger 3″ cup for a fully open briar rose but you could use the smaller 2.5″ cup to create a flower that is starting to bloom. Doing a mixture of the two could be fun for a cake.
You’ll need to heaviest wire, 20 gauge, to hold up this flower. But, for future cakes, if you don’t want to use a cake spike the you can omit the wire and place the rose directly on the cake. I did this for another project and I’ll post the tutorial soon.
Coming Up…
During the final class, lesson 4, these awesome floral creations will become even more lifelike with the application of edible color dust. Read about lesson 4 and the final cake here.


Leave a Reply